
Setting up a Proxmox Virtual Environment (PVE) server is one of the best moves you can make for managing home lab infrastructure or production server virtualization. Out of the box, Proxmox provides an enterprise-grade Debian-based hypervisor, but there are several essential post-installation setup steps you should perform immediately to ensure reliability, security, and smooth container deployment.
This guide walks through the fundamental configuration steps every new Proxmox administrator should complete right after initial installation.
1. Configure the No-Subscription Repository
By default, Proxmox VE ships configured with the pve-enterprise repository. If you do not have a paid enterprise subscription key, running apt update will display repository errors.
Switch to the Free No-Subscription Repo
- Open the Proxmox Web GUI (
https://your-server-ip:8006). - Select your node -> Repositories.
- Disable the
pve-enterpriserepository line. - Add the
pve-no-subscriptionrepository.
Alternatively, edit /etc/apt/sources.list.d/pve-enterprise.list via SSH terminal:
# Disable enterprise repository
# deb https://enterprise.proxmox.com/debian/pve bookworm pve-enterprise

# Add no-subscription repository in /etc/apt/sources.list
deb http://download.proxmox.com/debian/pve bookworm pve-no-subscription
After updating repository sources, run a full system update:
apt update && apt dist-upgrade -y2. Seed LXC Container & Community Templates
Proxmox makes deploying lightweight LXC Linux containers fast, provided you have downloaded system templates to your storage pool.
Downloading Templates via GUI & CLI
- Navigate to local (node) -> CT Templates -> Templates.
- Download essential base distributions: Debian 12, Ubuntu 24.04 LTS, and Alpine Linux.
To list and download templates via SSH using pveam (Proxmox VE Application Manager):
# Update available template list
pveam update

# List available Linux templates
pveam available

# Download Debian 12 LXC template to local storage
pveam download local debian-12-standard_12.2-1_amd64.tar.zst
3. Secure SSH with Key Authentication Only
To prevent brute-force attacks against your hypervisor, disable password authentication for SSH and enforce public key access.
Copy SSH Public Key to Proxmox Node
From your local workstation terminal:
ssh-copy-id -i ~/.ssh/id_rsa.pub root@your-proxmox-ipDisable Password Login in SSH Config
Edit /etc/ssh/sshd_config on the Proxmox node:
PermitRootLogin prohibit-password
PasswordAuthentication no
PubkeyAuthentication yes
Restart the SSH daemon to apply changes:
systemctl restart sshd4. Install Fail2ban and Enable Firewall Rules
Protect your Proxmox web interface and SSH ports against automated bots by installing fail2ban.
apt install fail2ban -yCreate a custom local configuration /etc/fail2ban/jail.local:
[sshd]
enabled = true
port = ssh
filter = sshd
logpath = /var/log/auth.log
maxretry = 3
bantime = 86400
Enable fail2ban service:
systemctl enable --now fail2banEnabling the Proxmox VE Firewall
- Navigate to Datacenter -> Firewall -> Options.
- Enable Firewall at the Datacenter level.
- Configure default inbound policy to
DROPand outbound toACCEPT. - Ensure an explicit rule exists allowing port
8006(Web GUI) and port22(SSH) from your trusted local IP range before activating.
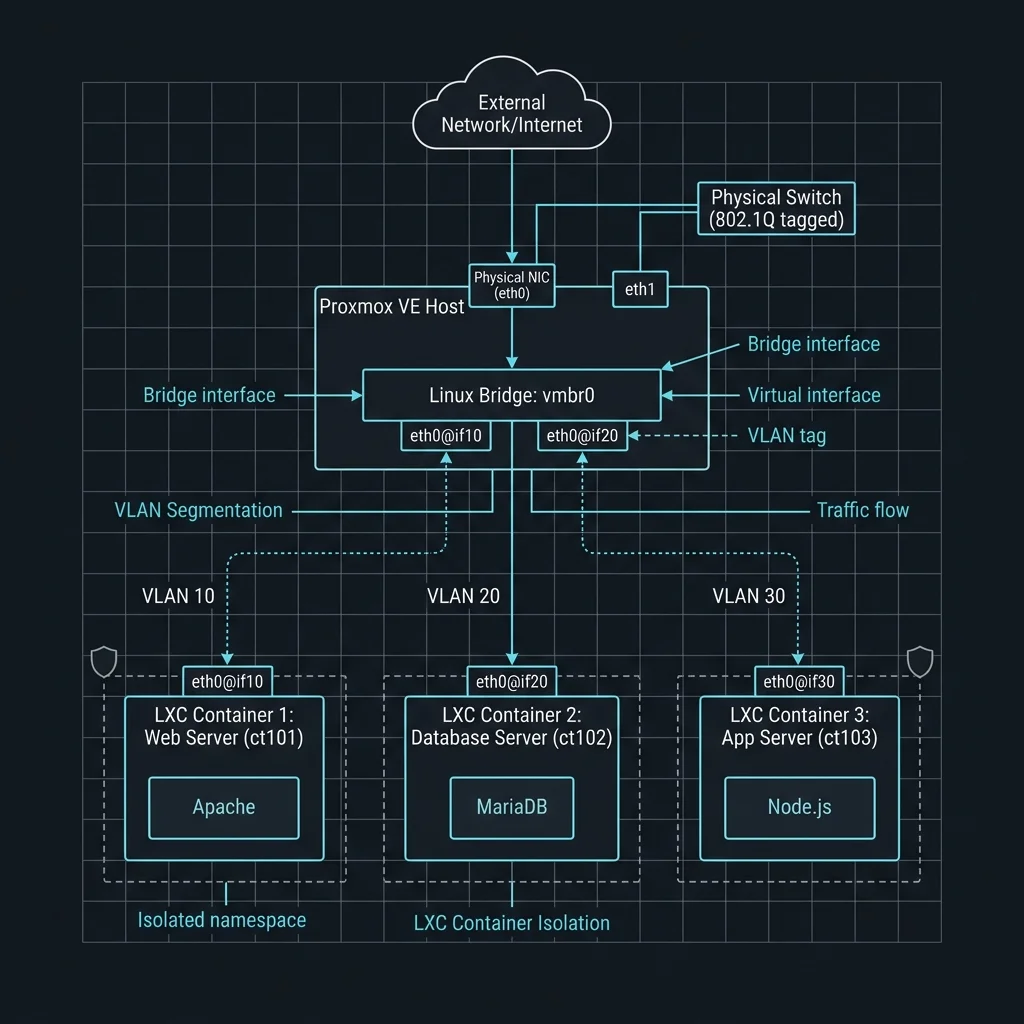
5. Network Configuration: Promiscuous Cards, VLANs & Isolated VMs
Proxmox utilizes Linux Network Bridges (vmbr0) to connect guest VMs and LXC containers to physical networks.
Promiscuous Mode & VLAN Tagging
- If running Virtual Routers (e.g. pfSense, OPNSense, or OpenWrt) inside Proxmox, ensure the physical network interface supports Promiscuous Mode so virtual MAC addresses pass cleanly.
- Enable VLAN Aware on
vmbr0if you plan to separate trusted devices, IoT hardware, and guest VMs into distinct VLAN IDs (e.g. VLAN 10 for Servers, VLAN 20 for IoT).
Creating Isolated Internal VM Bridges
For testing malware, sandbox environments, or unrestricted VMs, create a host-only bridge without an attached physical NIC (vmbr1). Guests assigned to vmbr1 can communicate with each other but remain completely air-gapped from your local network.
Conclusion
Completing these initial setup steps transforms your fresh Proxmox installation into a secure, hardened, and efficient hypervisor environment ready for production workloads and lab testing.